Showing posts with label Paper Crafts. Show all posts

Monday, March 10, 2014

IT'S ALIVE!!!!!!! A Big Apology and Recap of 2013 Projects

Please accept this picture of a sad cat as our most sincere apology. :( 

So you guys might have noticed that we've been on a horribly prolonged hiatus. While we'd like for you all to think that we've been out saving babies and kittens using our awesome crafting skills, the truth is we don't really have a valid excuse for our absence. I think what happened was that we missed a week of posting and then suddenly it was the new year. The good news is that we weren't completely unproductive; we actually have some stuff to share with you. We made a lot of fun stuff but some of it went undocumented because we just weren't in our usual blogger mindset. Again please forgive us. 

Yes Mushu, we have behaved most dishonorably.

To make up for everything this post is gonna be a quick recap of what we did take pictures of. Some of the projects will get their own blog post with tutorials. So on to the stuff. 

We made a giant gift basket full of goodies for our dear friend's baby shower. There's so much stuff crammed into the basket that it warrants it's very own post. So look out for it in the coming weeks. 

Ai has been on a bit of a shadow box kick lately. She's been making them to celebrate vacations and special occassions. Look at all the detail!!! ^_^ 

See this is how lazy we were to blog. We didn't even have the decency to share with you our awesome Threadcakes news. We somehow managed to snag a winning spot in our category! This year we're gunning for the number one spot, so look out for that later in the year. 

Ai got married recently and this was from her wedding shower! They're sugar butterflies that I will be teaching you how to make. The pink butterflies have brush embroidery details, which I've been obsessed with lately. I'll be doing a tutorial on that too. 

These were the thank you gifts we made for everyone who attended Ai's wedding shower. 

I have been so in love with Joe Pastry ever since I stumbled upon his blog. He is seriously the best. If you're looking for a pastry recipe, chances our he has a tutorial for it. I not only love that his recipes are so easy to follow, but also the fact that he explains the whys of the techniques used. If you haven't heard of him before go over to his blog now! 

  Most recent thing I did was make my birthday cake. Man am I getting seriously old. 

Also, I updated our most popular post since everyone has taken it upon themselves to sass us and let us know how dumb we are for failing and how we just weren't doing it right. Just a forewarning I got kind of sassy in the update, but seriously we knew what we were doing and I explain why the project is just a fail right from the start. Like I said, we went against our better judgment and wasted our time trying the project.

This is just some of the stuff we did during our absence. We promise to start posting weekly again. We have a lot of really great stuff planned for this year. We really are going to start making video tutorials. I know that October is a long way away, but we'll be posting about new costumes and cosplays. We might just be at Phoenix Comicon this year and cosplaying at a convention for the first time. We'll let you know if that's happening for sure. I can't really think of anything else at the moment, but we hope that too many of you haven't left us yet. As always happy crafting and baking! ♥  

Don't forget to follow us on SugiAi

Saturday, May 25, 2013

Harry Potter Craft Downloadables


I have some fun Harry Potter downloadables for you. There's the Hogwarts acceptance letter and envelope, labels for wand boxes, candy labels for Weasley's Wizard Wheezes, and some other stuff. All of this stuff is free to use as long as it's not for profit. 


To get the aged look on the paper and envelope I coffee stained everything and immediately dried the paper with a hair dryer. Also you may need to iron the paper so it's smooth for the printer. To do this take a hand towel and place it over the paper and iron  like normal. The letter is meant to be printed on a standard 8.5" x 11" piece of paper and then cut in half. The envelope is an A2 Baronial 4 3/8" x 5 3/4". In order to get the font right, you need to download the MAGIK font from here. You'll probably need to adjust it a bit because Google Docs reformatted the letter since magik is a special font. 

The front of the envelope

For the back I made "wax seals". Make sure to print on red cardstock or whatever color you want. 

I looked in the book so I could hand sign McGonagall's name


I made candy boxes out of cardstock. Just look on pinterest for some tutorials. I used a giant shoebox to put all the candy boxes in and labeled it a Skiving Snackbox. 


I made the number labels for the wands myself and the Ollivander's label I found on the internet and printed on blue cardstock. 


I also made my own owl post stamp. I got the owl vector from deviantart. 

Alright on to what you've all been waiting for. Everything except for the envelope is meant to be printed on 8.5" x 11" paper. Everything is free to use as long as you don't use them for profit. 


That's all for this week folks. Hope you enjoy using everything and it would be awesome if you sent us pictures of the things you make. Happy crafting! ♥  


Don't forget to follow us on SugiAi

Saturday, May 4, 2013

Harry Potter Paper Craft and Other HP Goodies


A dear friend of ours is now officially a dentist and that means she'll be moving away in a month. She's a fellow Harry Potter nerd and we decided to go all out and make her a bunch of cute little things as a graduation present. We had so much fun making everything and she absolutely loved it! 

 Ai made her the most beautiful paper craft shadow box and a cute little Harry Potter cube key chain. I made  her an acceptance letter, a wand (here's the tutorial to make your own), and a little door hanger for her office. 

The shadow box is just so gorgeous! 


The detail on all the little pieces is so amazing! 


We did the Pottermore thing so we could get officially sorted. Ai ended up in Ravenclaw and I got placed in Slytherin.

The key chain was made out of felt and stuffed with fluff. It's so cute! 

All the goodies together! 

We found the cutest box at Michaels! It's shaped like a suitcase and had a very Harry Potter feel to it.

That's all for this week folks! We hope you're inspired to go out and make some of your own nerdy crafts! Happy crafting and baking!♥  
Be sure to follow us on SugiAi

Saturday, March 2, 2013

DIY Harry Potter Wand Boxes


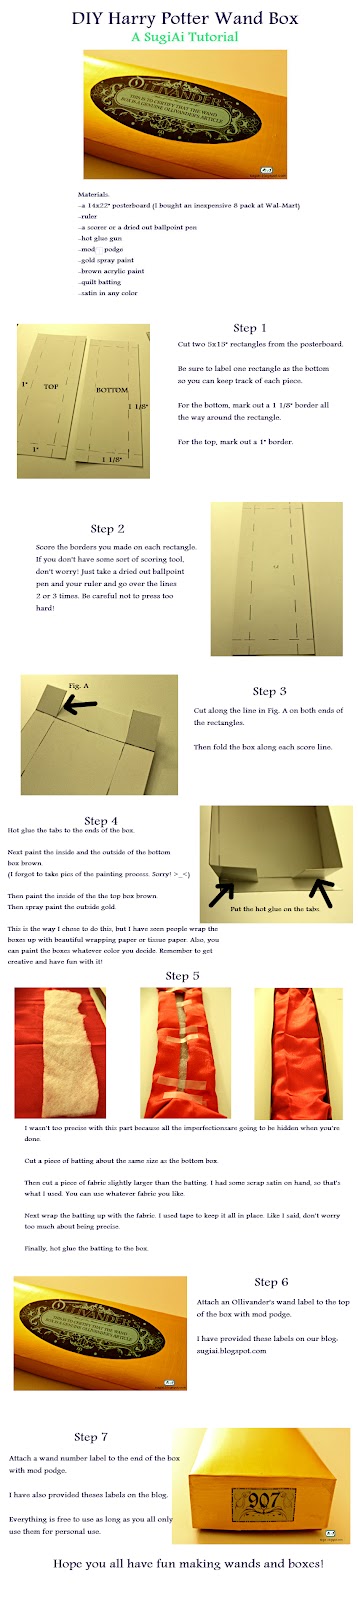
As promised, today I'm going to show you how to make a beautiful box to go with your new wands! I made up one of those nifty infographics. I hope the instructions are easy to follow, but if you have any questions feel free to message me. 

I'm also providing the labels that I used for the boxes. I found the Ollivander's label after searching around google for a while. I made the number labels myself. I'm providing the labels for free and ask that you only use them for personal use. This is the link to the number labels. Here is the Ollivander's wand labels. Both of the labels are made so that they can be printed on an 8.5x11 piece of paper. I used colored cardstock to print my labels. 

The instructions are hard to see so you can download the tutorial here.

Happy crafting and remember to have fun! ♥  

Friday, January 11, 2013

Christmas Cards


So Ai and I have been on a bit of a hiatus! But we're back and hope that everyone is having a great start to the new year! We were so excited this holiday season because we finally got around to making Christmas cards. It's something that has been on our to-do list for years and we're happy to report that the cards came out wonderful and that we actually sent them out on time! 

We kept the cards simple because we got a little carried away with buying festive card stock  I suggest investing in some because one booklet will definitely last you for years and I think they make excellent backgrounds. Another great tool we discovered for making perfect cards is a scoring board! We did get the Martha Stewart one, but only because it was on sale at Michaels! But don't fret if you don't want to shell out the money for one. A neat trick is to just use a ballpoint pen that no longer has any ink and a ruler. Just be sure to go over the line a few times if you're using a thicker card stock.

We decided to stick with two basic themes for our cards to make the work go by quicker. Ai made adorable little snowmen and I made snowflakes. We used ribbon and rhinestones for embellishments and attached them using hot glue.

All the cards! We even made envelopes using whole sheets of the Christmas card stock! 

We were obsessed with the glittery card  stock and put it on everything! 

Ai used ribbon to make scarves and bows for the snowmen! 

I didn't really use any patterns for the snowflakes, I just decided to have fun with it! But if you're looking for patterns, I know that Pinterest has a bunch!


That's all for this week folks! I hope you'll be inspired to make your own Christmas cards this year! We want to wish all of you a happy year full of crafting, delicious desserts, and lots of fun! ♥  

Thursday, July 19, 2012

Mixed Media Geisha


This week's post is a just a quick one. It's some old mixed media geisha I did. I gave it to Ai as a present a few years ago. As much as I love all the crafting and cooking, this is what I really love to do the most. I have a tendency to do pencil work with just a few pops of color here and there. 

The geisha's face, hair, and hand were all done in pencil. Her hair accessories and kimono were made of construction paper. The wood in her umbrella were made out of a few scrap pieces of balsa wood. The design and little details on the umbrella were made out of tissue paper. Finally, I threw in a few rhinestones because the sparkles add a nice touch. 

 A closer shot of the geisha. 

Details of her hair pieces and umbrella. 

Closer shot of the rest of the umbrella and part of her face. Eyes are some of my favorite things to draw.

You can see her kimono a little better in this one. The white and blue part are construction paper with some shading done with pencil to add more dimension.

I haven't done anything like this in a really long time, which is such a shame. Hopefully I'll get around to doing more of this kind of thing sometime soon. So that's all for this week folks! Happy crafting! ♥  

Thursday, July 5, 2012

Paper Craft Shadow Box


We're taking a break from desserts this week to share another one of our loves with you all! Paper crafts are something we've always been into, even though we didn't learn the name of what we were doing until a little while ago. Ai and I have been making cards for our friends for as long as we can remember. It's unfortunate that we never thought to take photos of everything we did. 

A few months ago we discovered that people put paper crafts into shadow boxes and we were in love! But so far Ai is the only one that's done an actual shadow box. I promise there will be more in the future! (If you couldn't tell we like to do too many different things. The ideas just never stop coming!) 

Ai crafted a beautiful rose with butterflies all out of card stock. All the intricate details were cut with and X-acto blade. The pieces were all put together with Mod Podge. On to the shadow box! 

The petals say Live, Life, and Love

A closer look at the words


You can see how lovely the butterfly wing looks here

That's all for this week folks! Hope you feel inspired to go out and make your own lovely shadow boxes! Happy crafting! ♥