Showing posts with label Nerd Stuff. Show all posts

Monday, March 17, 2014

Happy St. Patrick's Day and a Video Game Birthday Cake


Happy St. Patrick's Day and Happy Birthday to my little sister! I decided to make my sister a gaming cake this year and thought that a Minecraft Creeper border would be perfect for the holiday. The cake is a simple four layered yellow cake with chocolate ganache and vanilla buttercream. I made the decorations out of marshmallow fondant.


For the cake layers I used my favorite yellow cake recipe found here. I made two batches and threw in some rainbow sprinkles for one batch. For the ganache I used my all time favorite recipe. It's straight forward and easy to adjust if you need more or less ganache. Finally, for the buttercream I used this recipe. Since discovering this recipe it's the only one I use for buttercream. It works like a dream and as long as you carefully follow the instructions should turn out perfect every time. 

I topped the cake with Pokemon and Assassin's Creed. They're two of her favorite game series. 

I sculpted this to look like my sister dressed in Ash's clothes. 

I chose bulbasuar because he's green. I was being cheesy and tried to make everything green for St. Patrick's Day. And yes today is her real birthday. 

The Creeper face border. This was really fun and easy to make! 

The top of the cake. I ran out of room to fully spell out birthday >_< 

So that's all for this week. Hope you all have a safe and fun St. Patrick's day! Happy crafting and baking! ♥  

Don't forget to follow us on SugiAi

Saturday, May 25, 2013

Harry Potter Craft Downloadables


I have some fun Harry Potter downloadables for you. There's the Hogwarts acceptance letter and envelope, labels for wand boxes, candy labels for Weasley's Wizard Wheezes, and some other stuff. All of this stuff is free to use as long as it's not for profit. 


To get the aged look on the paper and envelope I coffee stained everything and immediately dried the paper with a hair dryer. Also you may need to iron the paper so it's smooth for the printer. To do this take a hand towel and place it over the paper and iron  like normal. The letter is meant to be printed on a standard 8.5" x 11" piece of paper and then cut in half. The envelope is an A2 Baronial 4 3/8" x 5 3/4". In order to get the font right, you need to download the MAGIK font from here. You'll probably need to adjust it a bit because Google Docs reformatted the letter since magik is a special font. 

The front of the envelope

For the back I made "wax seals". Make sure to print on red cardstock or whatever color you want. 

I looked in the book so I could hand sign McGonagall's name


I made candy boxes out of cardstock. Just look on pinterest for some tutorials. I used a giant shoebox to put all the candy boxes in and labeled it a Skiving Snackbox. 


I made the number labels for the wands myself and the Ollivander's label I found on the internet and printed on blue cardstock. 


I also made my own owl post stamp. I got the owl vector from deviantart. 

Alright on to what you've all been waiting for. Everything except for the envelope is meant to be printed on 8.5" x 11" paper. Everything is free to use as long as you don't use them for profit. 


That's all for this week folks. Hope you enjoy using everything and it would be awesome if you sent us pictures of the things you make. Happy crafting! ♥  


Don't forget to follow us on SugiAi

Thursday, May 9, 2013

We Were in a Book! We need your help to win a contest!


About a year ago there was an open call going around asking for people to submit their costume and cosplay photos. We decided to take a chance and submit a few things and one of our costumes ended up in the book! The book is called 1000 Incredible Costume and Cosplay Ideas. It was put together by Joey Marsocci aka Dr. Grymm, Allison DeBlasio, and the Queen of Cosplay Yaya Han. If you're interested in seeing some really beautiful costumes or if you're into cosplay you should really check the book out!

 Here it is! The costume was in the section of original characters! My sister was so excited to see herself.

Here's the original picture. 

Before we sign off, we need your help! We entered a contest that is voting based and we need all of you to vote so we can win. You do have to have a facebook to vote. Please vote and help spread the word! Thanks! We love you all! ♥  Go here to vote for us!

That's all for this week folks! Hope you all are getting ready for the summer! Happy crafting and happy baking! ♥  
Don't forget to follow us on SugiAi

Saturday, May 4, 2013

Harry Potter Paper Craft and Other HP Goodies


A dear friend of ours is now officially a dentist and that means she'll be moving away in a month. She's a fellow Harry Potter nerd and we decided to go all out and make her a bunch of cute little things as a graduation present. We had so much fun making everything and she absolutely loved it! 

 Ai made her the most beautiful paper craft shadow box and a cute little Harry Potter cube key chain. I made  her an acceptance letter, a wand (here's the tutorial to make your own), and a little door hanger for her office. 

The shadow box is just so gorgeous! 


The detail on all the little pieces is so amazing! 


We did the Pottermore thing so we could get officially sorted. Ai ended up in Ravenclaw and I got placed in Slytherin.

The key chain was made out of felt and stuffed with fluff. It's so cute! 

All the goodies together! 

We found the cutest box at Michaels! It's shaped like a suitcase and had a very Harry Potter feel to it.

That's all for this week folks! We hope you're inspired to go out and make some of your own nerdy crafts! Happy crafting and baking!♥  
Be sure to follow us on SugiAi

Saturday, March 2, 2013

DIY Harry Potter Wand Boxes


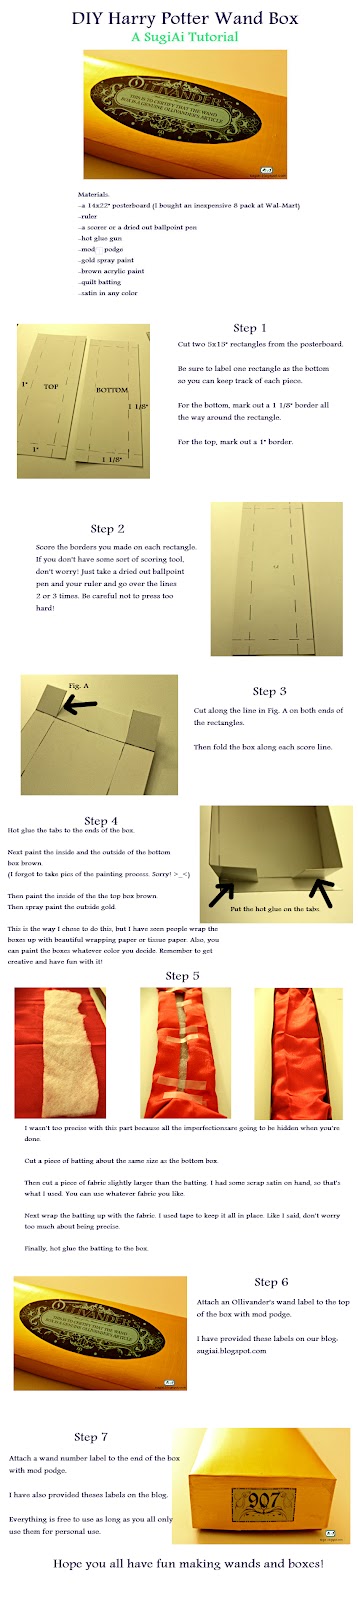
As promised, today I'm going to show you how to make a beautiful box to go with your new wands! I made up one of those nifty infographics. I hope the instructions are easy to follow, but if you have any questions feel free to message me. 

I'm also providing the labels that I used for the boxes. I found the Ollivander's label after searching around google for a while. I made the number labels myself. I'm providing the labels for free and ask that you only use them for personal use. This is the link to the number labels. Here is the Ollivander's wand labels. Both of the labels are made so that they can be printed on an 8.5x11 piece of paper. I used colored cardstock to print my labels. 

The instructions are hard to see so you can download the tutorial here.

Happy crafting and remember to have fun! ♥  

Saturday, February 23, 2013

DIY Harry Potter Wands


So last week I mentioned that I went on a Harry Potter crafting binge for Christmas. I really got carried away and decided to make wands. I found a really great tutorial. It's easy to follow and the supplies are pretty inexpensive. Since the wands were so easy to make, I ended up making more than I needed. I'll save them for future gifts for friends. 

For the most part, I followed the tutorial, but of course I had to do things my own way. In the end, I think that the changes I made make for an overall better and more durable wand. 

My tips for making the best Harry Potter wand:
  • I used dowels sized at 3/16 in. They were cheaper and easier to find than a pack of chopsticks. The dowels also allow you to be a bit more creative. You can cut the dowels to different lengths and also find them in different thicknesses. 
  • I made some small polymer clay decorative pieces. I baked the clay pieces first and then attached them to the wand while I was adding the glue.
  • Make sure you let the hot glue cool completely before painting.
  • Make sure you prime the wands first with a layer or two of white. It helps the final colors stick better.
  • To give the wands a nice shiny finish and durability, I used the Pledge Floor Finish with Future Shine stuff that I'm always talking about. Apply three layers, waiting about 30 minutes before adding another layer. Then let the wands dry completely overnight. This gives the wands a nice smooth and hard finish, which will make them last longer especially if they're going to be handled a lot by children. 
That's all the tips I have. I hope you all have a lot of fun making the wands! Next week I'll show you how to make easy and gorgeous wand boxes!

All the wands together. I made sure to keep one for myself! 

I tried my best to make all the wands different. I definitely strayed from making more traditional looking wands.

That's all for this week folks! Remember to have fun with this project and happy crafting! One more thing, please make sure you follow us on Pinterest! ♥ Follow SugiAi  

Saturday, February 16, 2013

DIY Harry Potter Monopoly


I went all out this past Christmas and decided to make my sisters a bunch of Harry Potter stuff. I saw pictures of this incredible Harry Potter monopoly set and thought that it was something you could buy. After doing a quick search it lead me to this incredible blog. To my great delight he made all his files available here for free! If you do use his files please respect his request to only use the files for personal and not monetary reasons. He worked really hard on the designs and it was incredibly kind of him to just give the files away for free. 

Since I didn't have to worry about designing the board and cards, I was able to focus on making my own game pieces. They were all made from polymer clay. If you've never worked with it before you can check out this post to get an idea of how to do it. One new tip I have about making polymer clay charms is how to finish them. I still use the future shine floor finish, but instead of doing one layer and baking it again, I do several layers and just let the pieces dry for 30 minutes before putting on a new layer. I do about 5 layers before letting the pieces dry fully over night. I find that this makes the finish shinier and sturdier. 

Alright on to the pieces and feel free to make similar pieces. I honestly just chose things that wouldn't take too long to make. 

All the pieces together. I made eight because the game came with eight pieces.

The Sorting Hat ended up being my favorite piece! I'm really happy with how it came out.

The Golden snitch! I made sure to paint this with really nice metallic acrylics.

Hedwig

The Monster Book of Monsters

I tried my best to make the Whomping Willow

Padfoot 

Nagini

My really sad attempt to make the Goblet of Fire

I also decided to paint all the houses like the four houses of Hogwarts and I spray painted all the hotels gold. 

I divided the houses up evenly and then painted them with acrylics. I sealed them with the same stuff I use to seal the clay pieces.

The hotels look really nice in gold! 

To round this post out I'll leave you with some tips to make sure your Monopoly ends up a success.
  • Go get the board and box top and bottom printed somewhere! I stubbornly printed things out on my own and it was really hard getting everything to align nicely. I had to print everything out in pieces because I only have a standard printer. 
  • Print all the cards on cardstock and then laminate them.
  • Buy the cheapest Monopoly game that you can find, since you're going to be butchering it. I got mine for $10 at Wal-mart.
That's all for this week folks! I hope you go out and make your own Harry Potter Monopoly! Happy crafting and I'll have more Harry Potter crafts for you in the coming weeks!♥ Oh and one more thing; we finally got Pinterest for the blog so please be sure to follow us! SugiAi