Saturday, April 20, 2013

Crazy about Ganache


So I've been on a ganache binge lately. Truth be told, I've always been too afraid to even go anywhere near ganache. I always thought that it was something too difficult and too beautiful to be made at home. After doing some research, turns out that I was dead wrong. Ganache is hands down the easiest and most beautiful thing you can make to decorate your desserts. 

Ganache is so versatile and absolutely delicious. After checking out a few recipes this was my favorite. Her recipe is easily adjustable for either larger or smaller quantities. There is one thing I need to confess here: I took a bit of a shortcut and used semisweet chocolate chips and heated the cream in the microwave! I have no idea if that's a no no, but the ganache turned out excellent. A word of caution with the chocolate chips though, you should definitely chop them up or run them through the food processor. 

I used the ganache as a glaze for some spring themed cupcakes:


I whipped it up and covered a cake with it:

Whipping it turns it into the most luscious and fudgey frosting you've ever had in your entire life!

I used it to glaze an entire cake (which I still have to work on getting the sides to be completely smooth) :


The recipe is a definite keeper! I can't wait to try to make truffles with the ganache and many more yummy things. 

That's all for this week folks! Don't be afraid to try ganache. I'm sure all of you can do it! Happy baking and happy crafting! ♥  

Don't forget to follow us on SugiAi

Sunday, March 31, 2013

Fun Kid Friendly Easter Egg Cake Pops


Happy Easter everyone! So I know that I'm a little late with this post, but I didn't want to make the pops too far in advance. I ended up doing these yesterday and wanted to have the blog up yesterday too, but I didn't have enough time. You guys will just have to save this project up for next Easter! 

The idea for these pops struck me when I saw all the cute mini plastic eggs at the store. It also occurred to me that we all tend to get carried away doing lavish and ornately beautiful cake pops which never seem like they would be something a kid could easily help with. So these pops are both cute and kid friendly. 


To make these you'll need:
  • All the basic cake pop ingredients. I used this chocolate cake and frosting recipe. It made about 45 cake pops.
  • Mini plastic eggs.
  • I only needed 2 bags of candy melts. If you want to lots of different colors, then you'd probably only need about half a bag of melts. 
  • An assortments of sprinkles.
  • Small treat bags and thin ribbon
By now most of you know how to make cake pops with your eyes closed, but if you're new to the party then head on over to Bakerella's original tutorial. But instead of shaping the eggs by hand, you use the mini plastic eggs! If you've got a lot of kids over the job will be done in no time. To shape them, I took a clump of cake about the size of the eggs, shoved it in there and squeezed out all the excess. This does make things a bit messy because all the buttery goodness gets all over the eggs, but I'm sure the kids will have a lot of fun!


Before you start dipping the pops, set up a table with all the sprinkles poured out into bowls for the kids. You do the dipping and hand the pops over to the kids for decorating and let them get crazy. The sprinkles guarantee that each pop will be beautiful and I know that the kids will come up with some unique sprinkle combinations! 

As a side note I decorated all my pops myself. My sisters weren't really up for helping >_<

I thought these little flower sprinkles were very easter.

The pops were for an Easter party, so I wrapped them up in mini treat bags and tied them with pastel colored ribbons.

Using the eggs made the cake go very far. So make sure you enlist a couple of kids to make the work faster and more fun.

That's all for this week! Hope you all had a lovely Easter! Happy crafting and baking! ♥  

Saturday, March 2, 2013

DIY Harry Potter Wand Boxes


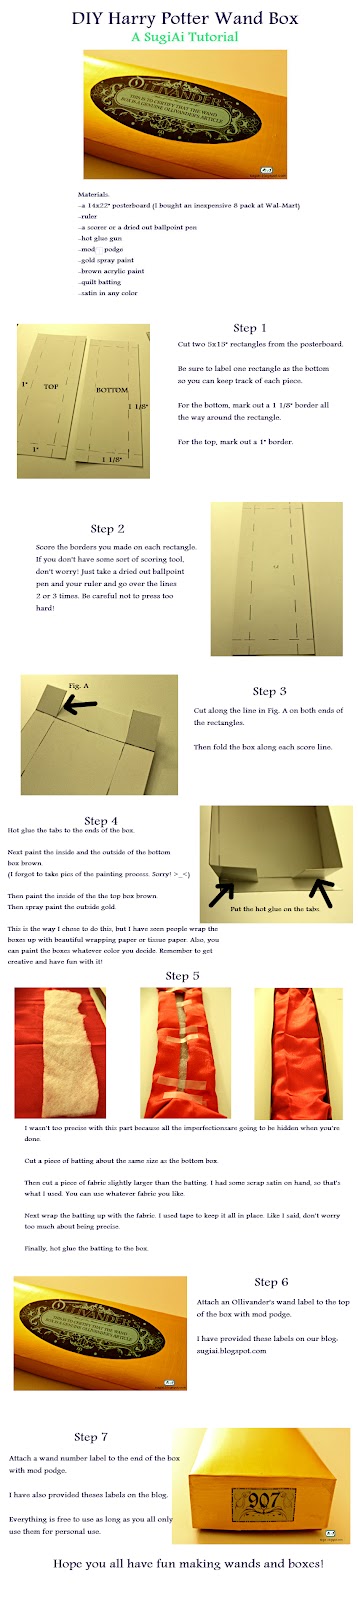
As promised, today I'm going to show you how to make a beautiful box to go with your new wands! I made up one of those nifty infographics. I hope the instructions are easy to follow, but if you have any questions feel free to message me. 

I'm also providing the labels that I used for the boxes. I found the Ollivander's label after searching around google for a while. I made the number labels myself. I'm providing the labels for free and ask that you only use them for personal use. This is the link to the number labels. Here is the Ollivander's wand labels. Both of the labels are made so that they can be printed on an 8.5x11 piece of paper. I used colored cardstock to print my labels. 

The instructions are hard to see so you can download the tutorial here.

Happy crafting and remember to have fun! ♥  

Saturday, February 23, 2013

DIY Harry Potter Wands


So last week I mentioned that I went on a Harry Potter crafting binge for Christmas. I really got carried away and decided to make wands. I found a really great tutorial. It's easy to follow and the supplies are pretty inexpensive. Since the wands were so easy to make, I ended up making more than I needed. I'll save them for future gifts for friends. 

For the most part, I followed the tutorial, but of course I had to do things my own way. In the end, I think that the changes I made make for an overall better and more durable wand. 

My tips for making the best Harry Potter wand:
  • I used dowels sized at 3/16 in. They were cheaper and easier to find than a pack of chopsticks. The dowels also allow you to be a bit more creative. You can cut the dowels to different lengths and also find them in different thicknesses. 
  • I made some small polymer clay decorative pieces. I baked the clay pieces first and then attached them to the wand while I was adding the glue.
  • Make sure you let the hot glue cool completely before painting.
  • Make sure you prime the wands first with a layer or two of white. It helps the final colors stick better.
  • To give the wands a nice shiny finish and durability, I used the Pledge Floor Finish with Future Shine stuff that I'm always talking about. Apply three layers, waiting about 30 minutes before adding another layer. Then let the wands dry completely overnight. This gives the wands a nice smooth and hard finish, which will make them last longer especially if they're going to be handled a lot by children. 
That's all the tips I have. I hope you all have a lot of fun making the wands! Next week I'll show you how to make easy and gorgeous wand boxes!

All the wands together. I made sure to keep one for myself! 

I tried my best to make all the wands different. I definitely strayed from making more traditional looking wands.

That's all for this week folks! Remember to have fun with this project and happy crafting! One more thing, please make sure you follow us on Pinterest! ♥ Follow SugiAi  

Saturday, February 16, 2013

DIY Harry Potter Monopoly


I went all out this past Christmas and decided to make my sisters a bunch of Harry Potter stuff. I saw pictures of this incredible Harry Potter monopoly set and thought that it was something you could buy. After doing a quick search it lead me to this incredible blog. To my great delight he made all his files available here for free! If you do use his files please respect his request to only use the files for personal and not monetary reasons. He worked really hard on the designs and it was incredibly kind of him to just give the files away for free. 

Since I didn't have to worry about designing the board and cards, I was able to focus on making my own game pieces. They were all made from polymer clay. If you've never worked with it before you can check out this post to get an idea of how to do it. One new tip I have about making polymer clay charms is how to finish them. I still use the future shine floor finish, but instead of doing one layer and baking it again, I do several layers and just let the pieces dry for 30 minutes before putting on a new layer. I do about 5 layers before letting the pieces dry fully over night. I find that this makes the finish shinier and sturdier. 

Alright on to the pieces and feel free to make similar pieces. I honestly just chose things that wouldn't take too long to make. 

All the pieces together. I made eight because the game came with eight pieces.

The Sorting Hat ended up being my favorite piece! I'm really happy with how it came out.

The Golden snitch! I made sure to paint this with really nice metallic acrylics.

Hedwig

The Monster Book of Monsters

I tried my best to make the Whomping Willow

Padfoot 

Nagini

My really sad attempt to make the Goblet of Fire

I also decided to paint all the houses like the four houses of Hogwarts and I spray painted all the hotels gold. 

I divided the houses up evenly and then painted them with acrylics. I sealed them with the same stuff I use to seal the clay pieces.

The hotels look really nice in gold! 

To round this post out I'll leave you with some tips to make sure your Monopoly ends up a success.
  • Go get the board and box top and bottom printed somewhere! I stubbornly printed things out on my own and it was really hard getting everything to align nicely. I had to print everything out in pieces because I only have a standard printer. 
  • Print all the cards on cardstock and then laminate them.
  • Buy the cheapest Monopoly game that you can find, since you're going to be butchering it. I got mine for $10 at Wal-mart.
That's all for this week folks! I hope you go out and make your own Harry Potter Monopoly! Happy crafting and I'll have more Harry Potter crafts for you in the coming weeks!♥ Oh and one more thing; we finally got Pinterest for the blog so please be sure to follow us! SugiAi