Sunday, August 28, 2011

A Bunch of Random Clay Charms


So today's blog is really just a big photodump of things we've had sitting around. There won't be a wordy intro today. hahahhaha (I'm sure you all just love how much I love to write >_<) But if you are interested in making your own clay charms check out our last post! Anyways I promised I wouldn't write much so on to the pictures!!! 

A cute little pig with a big ribbon. We have a weird obsession with ribbons! 

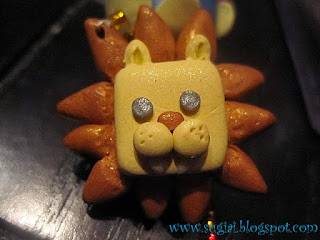
Cube lion

Cube Animals 

Cactus guy based on one of our friends 

Another cactus friend

Banana split

Triple scoop ice cream cones 

more cupcakes

yeah so we're like everyone else and love cupcakes. lol

Chu pocky! ^3^ 

A Harry Potter inspired broom

A giant toothbrush for our friend Thao! She's gonna be a dentist! 

A tooth to go with the big toothbrush

Island turtle and surfboard

Dango!! yummy! 

An adorable poodle! (I told you we liked ribbons!) 

A Chicago Bear (yeah we like puns too! haha)

We made hotdogs for headbands we wore to a hotdog themed jam. We're such nerds we wore red and yellow shirts with the headbands so we could be ketchup and mustard! 

So that's all for this week folks! Hope you enjoyed seeing how random and nerdy we are, there'll definitely be more weird, random, nerdiness from us in the future! ♥  

Monday, August 22, 2011

Cupcake Charms and Polymer Clay Charm and Magnet Crafting Tips


So today's post is mostly just going to be a showcase of some of the cute clay things we've made. We talked about how we go about making these things last week but we'll go over it again so you can go out and make your own. 

Here's what we use to make magnets
  • Sculpey brand polymer clay
  • Acrylic paints 
  • Pledge with Future Shine for a shiny finish
  • Epoxy glue and round magnets from Michaels 

Here's how we go about making the magnets:

  • We figure out a theme we'd like to do and start sculpting. If you've ever played with play dough or anything similar then you should be able to work with the Sculpey. It's pretty user friendly.
  • After we sculpt, we follow the directions on the box and bake the clay in the oven, let them cool and paint them. Then we take rubbing alcohol and clean off the figurines. It helps the future shine stick better.
  • After cleaning the figurines off we apply a couple layers of the future shine and let them dry a bit before baking them again at 215 degrees for 10 minutes. 
  • After we let the figurines cool off we use the epoxy glue to attach the magnets. Epoxy glue sets pretty fast so you don't have to wait too long before you get to use the magnets.


Here's what we use to make charms:
  • Sculpey brand polymer clay
  • Acrylic paints
  • Eye Pins
  • Split Rings
  • Pledge with Future Shine for a shiny finish

Here's how we go about making the charms:

  • We figure out a theme we'd like to do and start sculpting. If you've ever played with play dough or anything similar then you should be able to work with the Sculpey. It's pretty user friendly. 
  • Then we insert an eye pin in the top of the figure.
  • After we sculpt, we follow the directions on the box and bake the clay in the oven, let them cool and paint them. Then we take rubbing alcohol and clean off the figurines. It helps the future shine stick better.          
  • After cleaning the figurines off we apply a couple layers of the future shine and let them dry a bit before baking them again at 215 degrees for 10 minutes. 
  • After we let the figurines cool off we attach the split rings. Now you can use the charms for jewelry or anything else you want!
Now on to the stuffs!!! 

Cupcake charms for cell phones 

A very royal cupcake! 


Strawberry Cupcake

Cupcake with a cherry on top! 


An adorable bear cupcake! 

Elmer Fudd magnet....shhhh he's hunting wabbits! 

Chopper from One Piece 

So that's all for this week folks! Go out and make some cute things for yourself and remember to be creative and have fun with it! ♥  

Monday, August 15, 2011

Why we'll probably never do cake pops ever again and cowboy themed magnets


This week's post isn't going to be a normal one because we've got another cake pop fiasco story to tell you before we get to the magnets. Before we get into our story here are the things you need to know about us: 
  • We have a bad habit of taking on large projects and insisting on doing them all on our own.
  • We can never do anything simple; we just always have to make everything so fancy, special, and as original as possible.
  • We are stubborn and determined and will keep on going until we finish or die trying. 
So our story begins with us thinking we could make 150 western themed cake pops for a wedding party. Like always, we thought that it wouldn't be too much of a problem. And like always, we were definitely wrong. We started out strong since we had (at the time) a solid game plan. We decided we were gonna do three different designs: cowboy hats, cacti, and boots. 

To make a long story short, things did not go at all how we planned. We had to scrap the cacti because their arms kept falling off and ended up turning them into balls. After that, things just started going downhill, we had mishap after mishap until the very end. The only thing that seemed to go well was the chocolate. We didn't have any problems with it since we had corrected our mistakes from the first time we made cake pops. By the end of the night, we were a complete mess:

We really did say all this stuff. We had more gems but honestly this whole ordeal is just a blur now. At one point we considered turning on a camera a just letting it run so we could watch ourselves over and over again and just laugh. 

After all our melodrama we did finish and from what we've heard the people at the party enjoyed them. So we learned a valuable lesson from this, we are never ever ever ever going to try and do this many cake pops again. Also the moral of our story is to not bite off more than you can chew and that Ai and I are big dummies who love getting ourselves into ridiculous situations and have no one to blame but ourselves. 

Here's the only picture we took. It's the cowboy hats and I guess they don't look all that bad. >_< 

Alright now that that all is out of the way let's get on to the magnets. Ai did these ones by herself. They were for a friend of hers and they fit in with the cowboy theme of this post. Since we've never really discussed the materials we use for making our magnets here's what we typically use:
  • Sculpey brand polymer clay
  • Acrylic paints 
  • Pledge with Future Shine for a shiny finish
  • Epoxy glue and round magnets from Michaels 
Here's how we go about making the magnets:
  • We figure out a theme we'd like to do and start sculpting. If you've ever played with play dough or anything similar then you should be able to work with the Sculpey. It's pretty user friendly. 
  • After we sculpt, we follow the directions on the box and bake the clay in the oven, let them cool and paint them. 
  • Then we take rubbing alcohol and clean off the figurines. It helps the future shine stick better. 
  • After cleaning the figurines off we apply a couple layers of the future shine and let them dry a bit before baking them again at 215 degrees for 10 minutes. 
  • After we let the figurines cool off we use the epoxy glue to attach the magnets. Epoxy glue sets pretty fast so you don't have to wait too long before you get to use the magnets.
Cowboy themed magnets with a clover and pot of gold thrown in there because Ai's friend is Irish.
Tractor and Cowboy Cactus 

Her adorable dog

A pot of gold at the end of the rainbow and a clover

Ai's friend and her husband


Horses! 

So that's all for now folks! Go out and make your own magnets, it's a lot of fun, but do not go out and make overly complicated cake pops! ♥  

Monday, August 8, 2011

French Macarons


Back in March we discovered that a local bakery, Essence in Tempe near ASU, sold  French Macarons and after reading reviews online we decided to go check it out. Their breakfast was yummy and their macarons were delicious! They were like nothing I've ever had before; they were crunchy, chewy, and creamy all in one bite. I was immediately obsessed and knew that I had to try to make some of my own. 

Finding an easy to follow recipe was difficult, but eventually my search led me to Tartelette. Her recipes are amazing! I was a little daunted by the task of making something so delicate, but I was determined to learn how to make these, especially because they are a little pricey. Fortunately, I was successful (a lot of that had to do with Tartelette's recipe) and have managed to make them a few times. 

I never follow recipes all the way because I like to play around with my own flavors. So the following recipes are modified versions of Tartelette's. 

Chocolate Macarons with a Shoyu Caramel Buttercream 


For the shells (modified from Tartelette's Snicker's Macarons

3 egg whites (1-2 day old)
50 gram granulated sugar
200 gram powdered sugar (minus 2 Tbsp)
110 gram almonds (blanched)
3 Tbsp cocoa powder

  1. The day before (24hrs), separate your eggs and store the whites at room temperature in a covered container. If you want to use 48hrs (or more) egg whites, you can store them in the fridge.In a stand mixer fitted with the whisk attachment, whip the egg whites to a foam, gradually add the sugar until you obtain a glossy meringue. Do not overbeat your meringue or it will be too dry and your macarons won't work. 
  2. Combine the almonds, cocoa powder and powdered sugar in a food processor and give them a good pulse until the nuts are finely ground. Pass through a sieve. Add them to the meringue, give it a quick fold to break some of the air and then fold the mass carefully until you obtain a batter that flows like magma or a thick ribbon. Give quick strokes at first to break the mass and slow down. The whole process should not take more than 50 strokes. Test a small amount on a plate: if the tops flattens on its own you are good to go. If there is a small beak, give the batter a couple of turns. 
  3. Fill a pastry bag fitted with a plain tip with the batter and pipe small rounds (1.5 inches in diameter) onto parchment paper baking sheets. Preheat the oven to 315F. Let the macarons sit out for an hour to harden their shells a bit and bake for 8-10 minutes, depending on their size. 
  4. Let cool. If you have trouble removing the shells, pour a couple of drops of water under the parchment paper while the sheet is still a bit warm and the macarons will lift up more easily do to the moisture. Remove them almost immediately, when they aren't too hot to pick up. Let cool on a rack.
  5. Pipe or spoon buttercream on one shell and sandwich with another one.
Shoyu Caramel Buttercream

1 Tbsp Butter
1/4 Cup Brown Sugar
1 1/2 Tbsp Shoyu (soy sauce) 
Your go to buttercream recipe

In a heavy saucepan melt butter over medium heat. Add the brown sugar and shoyu and allow to caramelize. Remove from heat and let cool. Once cool, add the caramel to your buttercream.

(This is a disclaimer about how I'm not very good writing up my own recipes. I'm a taste as you go kind of person, I only measure things when I bake. The shoyu caramel buttercream I made on a whim. I thought the salty umami flavor would go nice with the sweetness of the shells. So you can certainly fill the shells with whatever buttercream or ganache you like!) 


Strawberry Macarons with Chocolate and Fresh Stawberry Buttercream

For the Shells 

3 egg whites (1-2 day old)
25 gram granulated sugar
2 tsp strawberry extract flavor
2 drops red food coloring
200 gram powdered sugar (minus 2 Tbsp)
110 gram almonds (blanched)

It's the same process as the one for making the chocolate shells. Except for a few changes: you're going to add the strawberry extract and food coloring during the meringue step. You can add more flavoring and food coloring until you get it to where you want. 

For the Filling

I used a chocolate buttercream and added finely diced fresh strawberries.


What the inside of a macaron looks like. It should have a light crunchy outer shell and a fluffy/chewy inside.


I know that making these can seem intimidating so here are a few tips:
  • Take your time and follow the recipe closely the first time you do this. This is a very technique sensitive desert, so don't rush the steps.
  • Blanch your own almonds! It'll take more time, but save you money. Here's how to:

    1. Buy raw almonds. Make sure they are not roasted or salted, etc. 
    2. Fill a small saucepan half full of water and bring to a boil.
    3. Slide the almonds into the boiling water for 30 seconds. 
    4. Remove from heat and drain. I like to give them a quick rinse with cold water so they aren't too hot to handle. 
    5. Grasp the almond between your thumb and forefinger and slide the skin off.
    6. Pat blanched almonds dry with paper towel. 
  • Stick to using metrics because it is a more precise form of measurement. So go out and get an inexpensive food scale! 
  • Have fun with the flavors! Go crazy and try different things. Macarons are easy to experiment with once you get the basics down. 
So go out and make your own macarons. They are addictive and all the work is definitely worth it!  
Ai is back so we'll be getting back to our joint projects. ♥