Monday, June 27, 2011

Om Nom Nom! It's The Cooking Corner!


So this is the very first post of a little segment of our blog that is going to be all about food!  We're both big time foodies and love eating and trying new foods.  I (Sugi) am the one that loves cooking and baking, mostly because I'm one of those people who loves to feed everyone!  So in our Cooking Corner posts I'll be sharing tips and recipes with all of you, but there will also be times where I'll be teaching Ai how to  make yummy treats.  Anyways enough of these long intro blurbs I keep doing and on to today's Cooking Corner recipe!  Today we're going to explore Doughnuts! 

The following doughnut recipe can be used to make any of the basic doughnuts you can find in a shop.  I made Boston Cream, Strawberry Glazed, and Powdered doughnuts with the recipe.

Doughnuts 

Ingredients

  • 2 (.25 ounce) envelopes active dry yeast
  • 1/4 cup warm water (105 to 115 degrees)
  • 1 1/2 cups lukewarm milk
  • 1/2 cup white sugar
  • 1 teaspoon salt
  • 2 eggs
  • 1/3 cup shortening
  • 5 cups all-purpose flour
  • 1 quart vegetable oil for frying

Directions

  1. Sprinkle the yeast over the warm water, and let stand for 5 minutes, or until foamy.
  2. In a large bowl, mix together the yeast mixture, milk, sugar, salt, eggs, shortening, and 2 cups of the flour. Mix for a few minutes at low speed, or stirring with a wooden spoon. Beat in remaining flour 1/2 cup at a time, until the dough no longer sticks to the bowl. Knead for about 5 minutes, or until smooth and elastic. Place the dough into a greased bowl, and cover. Set in a warm place to rise until double. Dough is ready if you touch it, and the indention remains.
  3. Turn the dough out onto a floured surface, and gently roll out to 1/2 inch thickness. Cut with a floured doughnut cutter. Let doughnuts sit out to rise again until double. Cover loosely with a cloth.
  4. Heat oil in a deep-fryer or large heavy skillet to 350 degrees F (175 degrees C). Slide doughnuts into the hot oil using a wide spatula. Turn doughnuts over as they rise to the surface. Fry doughnuts on each side until golden brown. Remove from hot oil, to drain on a wire rack. 

Tip: I made my doughnuts mini and I didn't have a doughnut cutter, so I used a small glass cup to cut out  round hole-less doughnuts.  Since they were pretty small they cooked all the way through without having a hole.  

Mini Boston Creams 


Ingredients

Above Doughnut recipe
3.8 oz (small box) of instant vanilla pudding or any custard recipe you may have

Chocolate Glaze
  • 3/4 cup semisweet chocolate chips
  • 3 tablespoons butter
  • 1 tablespoon light corn syrup
  • 1/4 teaspoon vanilla extract
Directions
  1. Make doughnuts using the above recipe.
  2. Let the doughnuts cool completely before filling.
  3. Fill the doughnuts with the custard using a marinade injector thing (I don't know what these things are    actually called >_<).  (The injector thing was perfect for the size of these doughnuts)
For the Chocolate Glaze
  1. In a double boiler over hot, but not boiling water, combine chocolate chips, butter, and corn syrup. Stir until chips are melted and mixture is smooth, then add vanilla.
  2. Dip doughnuts into glaze and let rest on a wire rack.


Mini Powdered Doughnuts

To make these you just need to put a few doughnuts (that you made using the above recipe)  in a brown paper lunch bag with some powdered sugar and shake the bag all around!  After a few vigorous shakes you'll have your own delicious powdered doughnuts!  


Mini Strawberry Glazed Doughnuts


Strawberry Glaze

  • 1/3 cup butter
  • 1/4 cup finely chopped strawberries
  • 2 cups confectioners' sugar
  • 1 1/2 teaspoons vanilla
  • 4 tablespoons hot water or as needed

  • Directions

      1. Melt butter in a saucepan over medium heat. Add strawberries.  Stir in confectioners' sugar and vanilla until smooth. Remove from heat, and stir in hot water one tablespoon at a time until the icing is somewhat thin, but not watery.
      2. Dip the doughnuts (again the ones you made from the above recipe ^_^) into the glaze and let cool on a wire rack.


      So I hope you try out this recipe and enjoy your homemade doughnuts! 

Sunday, June 19, 2011

Hats!!! and a pair of shoes!


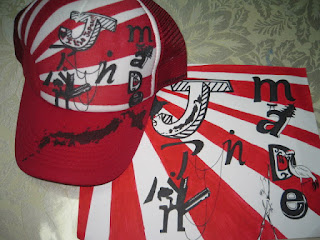
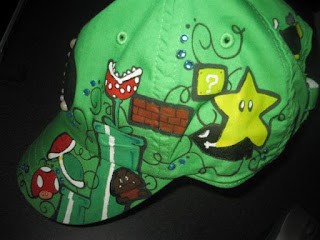
So this post is all about hats and a random pair of shoes.  Like a lot of other people out there we've had the brilliant idea of customizing hats and other accessories.  We haven't done too many of these types of projects, but we wanted to share what we have with you all.  Hopefully in the future you'll be seeing a lot more of these custom items from us.  All the hats have been customized with acrylic paint, permanent markers, or a combination of both.  As far as the designs go, we just picked different themes and ran with them.  Now on to the hats!! 

This first batch of hats are all done by Ai.  She's done a bunch more of these than I(Sugi) have.  I even own one of the hats she's done!  So on to her amazing hats! 

A super cute Japanese themed hat. This is the one I own and love! ^_^ 

This is a really pretty abstract one. 


This is a dragon hat she did for her brother! 

Now on to a hat and a pair of shoes I've done! 

A koi and dragon on shoes (how original! haha)

Close-up of dragon

The koi!

So before I put up the hat I've done recently, let me just put this disclaimer saying I don't paint very well.  And honestly, I don't have an explanation for why I would be compelled to practice painting on a hat.  All I can say is that I really really wanted to paint The Hulk onto a white hat!  Now on to the hat!

It's The Hulk! I really adore him! 

Now this last batch of photos is part of a Halloween costume we a did few years back.  We wanted to be the girl versions of Mario and Lugi and made cute custom hats for our costumes.  Ai was Luigi and I was Mario.  So the Luigi hat was done by her and the Mario one by me!


So now you all know that Ai is the superior one at painting!  And I mean that!  She's always been a great painter!  Painting is not my forte, but I'm definitely going to keep practicing!  That's all for now folks!  Hope you enjoyed our hats! 

Sunday, June 12, 2011

Magnets

~So this is the first of many posts on our blog, which if you couldn't tell is going to be about crafts and things related to crafts.  So we hope you enjoy all the things we create and have fun while you explore all the stuff that springs up from our imagination!~


This first post is all about magnets! We needed magnets for our refrigerator! Our process and supplies are pretty basic.  We used polymer clay to make the magnets and we were pretty much inspired by random things.  We just wanted everything to be super cute!  After we sculpted and baked our little creations, we painted on the details using acrylic paint.  To make everything super shiny we used a spray on gloss, which apparently is a big no-no!  Spray glazes make polymer clay super sticky!!!!!! But thanks to this wonderful blog by Cindy Lietz we found the solution to our finishing problems!! We are so thankful to have found the help we needed!  Anyways after all of this we used epoxy glue to glue the clay to round magnets. So now on to the magnets!!!! 

These are the yummy food magnets

Various fruits and veggies (We're obviously fond of putting faces on things!)

Animals! 

A busty mermaid, Japanese girl, and a cute blood drop

And now for close-ups of some of our favorites! 

The beautiful busty mermaid in all her glory

Sushi platter

Spaghetti and meatballs

Short stack of pancakes

Cookie platter

Banana Split

Sugi's favorite animal! 

Adorable Japanese girl

Octopus

Toast and egg with super cute faces! 

Blood drop

So that's all for now folks!